FAQ
What Are The Advantages And Disadvantages Of The Different Log Species?
The cost of cedar logs can be as much as 40% higher than pine, however, an anomaly in the market at this time has current raw material of incense red cedar pricing at about 5% more than pine. In some log profiles we offer cedar for the same price as pine. Incense cedar is the most desirable wood species to use for your log home as it is the most stable wood species, which means it has fewer and smaller checks (cracks) and has less settling than any other wood suitable for log home construction. In addition, cedar is also naturally resistant to black mold, mildew, rot, fungus, decay and nasty insects. Equally important to the pleasant aroma, the tan and light color variation makes cedar a beautiful choice for a log home.
We also use Douglas fir. It is a denser wood, stronger, with a reddish color and tight grain. It is the strongest and heaviest of our selection. Because of its density, it will have a slightly lower insulating quality than either pine or cedar. If you like the reddish tone, it is beautiful.
See the chart below of showing the results as concluded by the National Bureau of Standards using a 7” square log.
What About Warping?
Warping is largely a characteristic of the logs selected for your home. We are pretty fussy about log quality and use wall logs bearing a high grade and beam logs of even a higher grade. It is our philosophy that the better the log, the better the log home. So you will not have a challenge with any of our wood species, no matter what you want to build with. However, as with any lumber, if the logs are not stacked within about a month of being milled, they will begin to show evidence of warping. The hotter and drier the location, the more warping will be evident. Our logs are milled just prior to shipment to assure you receive the straightest possible logs.
What Are The Advantages & Disadvantages Of Panelizing?
The advantage to panelizing is discussed in comparison to stick-built homes. With panelizing, the walls come pre-assembled in sections, making construction quicker. We use panelizing sometimes for small cabins and framed/log sided garages. You get a higher R Value in using panelized/insulated walls, but also lose the thermal mass advantage of solid timber walls. So it is a trade off. Framed walls made-to-look-like-log inside and out require more labor to build than solid log walls. Panelizing improves the labor efficiency of framed walls to make them more equal to log walls.
If you are opposed to checking in the logs, then panelized/log sided and T&G interior paneling will give you the same appearance as D-Log with minimal checking. However, panelizing generally limits your corner options to corner boards, vertical log or vertical timber.
How Do I Trim My Windows And Doors?
There is no one particular way to trim a window or door. It depends somewhat on what profile of logs your home is built with. There are a wide range of designs. There are three things that are important.
- Do you like the look?
- Does it cover the settling space above the window or door?
- Does it keep the weather out?
If you have achieved these objectives then it doesn’t really matter what you do. Pictures of methods others have used are available by request.
How Much Eave Should I Have On My House?
The length of eave is often a function of the weather conditions where the home is built. Typically 2 feet is adequate for most locations. However, in high snow load areas the eave should be longer to help keep the snow from piling up against the side of the building. Three or even four feet can be very helpful in keeping your logs dry in the winter. The steeper the pitch of the roof, the longer the eave should be so that it extends adequately far over the edge of the logs. Make sure the tails of the logs at the corners are adequately protected as they are most susceptible to decay if constantly exposed to moisture.
Another location where the eaves should be longer than two feet is in high rainfall areas, especially where it is often windy.
Just as important in high snow load areas is the ground slope away from the building and how high the home is off of the ground. We’ll talk about that later in the next question.
If I Don’t Have A Basement, How Tall Should I Make The Stem Wall?
If your building site is in a high snow load area, it is best to have your home at least two feet off of the ground to help keep the snow off of the side of the building when it comes off of the roof. In most locations the frost depth is 24 inches, so a four foot stem wall works well. You can get by with a three foot stem wall as you will typically have a 10 to 12 inch thick footing, giving you the 24 inch frost depth you need and still leave your home about two feet above ground. Having a greater slope to the ground away from the building decreases the accumulation next to the building. The roofing material used also affects the snow accumulation challenge.
What Type Of Roofing Should I Use?
That depends on three things. What look do you want, how often is acceptable for replacement and what is your budget? The two most common options are architectural composite shingles or metal.
First, let’s consider metal. The two most common choices are what is known as Delta Rib and Standing Seam (sometimes called Snap Lock or other names, depending on the manufacturer). My recommendation for metal is Standing Seam unless you are building in a high snow load area and have valleys in your roof design (which I don’t recommend, but we will talk about that later). The advantage to Standing Seam is that the screws in all of the metal are covered except those in the trim. That means over time you will not have a challenge with the screws working themselves out of the roof because they are all covered and the snow and ice doesn’t work away at them. However, it does cost more than Delta Rib and does take longer to install as most manufacturers make it in 12 inch wide strips rather than three feet wide like Delta Rib.
Now let’s consider composition shingles. My recommendation is what is called either a 50 year or limited lifetime shingle, depending on what the manufacturer calls their product. They are considerably thicker than 30 year shingles, giving them much more resistance to wind. These 50 year shingles last longer, almost give the roof the appearance of having shakes and are surprisingly not much more money than 30 year shingles. For most of us, if the roofing needs replaced in 50 years, it won’t be our problem anyway. So also take that into consideration when deciding if the additional cost of a metal roof is worth it to you. Composition roofing is also a good choice for low pitch roofs. That brings up another good question.
What Pitch Of Roof Should I Use?
Again, that depends. Does your home have a second floor? If it does, how do you want to design the second floor plan? Do you want the snow to stay on the roof or come off? And, is it important to you how easy your home will be to roof? Let’s take one at a time.
Many log homes have a second floor, as in the case with most cabins, a loft. Things that often require consideration for ceiling height are stairways and bathrooms. Adequate clearances to meet building codes are often achieved through roof pitch, second floor pony walls and dormers. We’ll address pony walls and dormers later. For now let’s focus on the roof pitch. The steeper the pitch the quicker you gain head space near the wall. For example, with a 12/12 pitch with each foot you come away from the wall you gain one foot in height. So at 6 feet from the wall most people can stand comfortably. Also, a little over 6 feet is required over bathroom fixtures to meet building code requirements in most states and 6 foot 8 inches between the stairs and ceiling. Take this into consideration when doing the floor plan of the second floor.
Another way to avoid snow gathering against the side of the building is to leave it on the roof rather than have it slide off. By having a lower pitch roof, say 8/12 or less and using composite roofing will, in most cases, prevent the snow from sliding off of the roof and eliminating the need to deal with it when it on the ground. The reason I say use a roof pitch of 8/12 or less is that with steeper roofs the snow moves more and wears away at the granular in the roofing, causing undesired wear of the shingles. With flatter roofs the snow moves less causing less wear. With a log home I suggest using at least a 6/12 roof pitch to maintain the log home appearance. The exception to that would be if you desire to achieve a Bavarian appearance to your home, which typically has a 3 to 4/12 pitch roof.
If you aren’t doing the building then it probably doesn’t matter how easy it is to roof, however, steeper roofs do cost more to build. But, the difference in cost or ease of roofing should not be the main criteria for the pitch of your roof.
How Can I Obtain Additional Usable Space On The Second Floor Without Making The Building Footprint Larger?
There are three good options with advantages to each. Let’s consider pony walls first. Just so we are on the same page, pony walls are exterior walls of the building that extend above the second floor.
Pony Walls:
 If you would like additional usable space on the entire second floor, but don’t need or want 8’ walls, then pony walls are a viable option. You can determine how much wall height you want or need given the floor plan you want. Although that wall could be stick framed and sided to match the logs below, it makes the most sense to build the pony walls with log. The reason I say it makes the most sense is for several good reasons including the following:
- Even though it does cost a little more for the material as log for the walls, you get more than with a framed wall. You not only get the structural, but also the exterior finish, better insulation and the interior finish.
- It costs less in labor to build the pony walls with log as it takes less time than framed walls when you include all of the components that go into a framed wall.
- You get a consistent look of the structure when you continue up with logs as the corner system remains the same and you have no difficulty getting the inside or outside to match.
- It allows you to retain a simple roof system and thereby reducing roofing costs and complications that can be caused by dormers. See below.
Gable Dormers (sometimes called doghouse dormers):
 These are the dormers that have a peak to the roof. The advantage of this type of dormer is that they add style and decoration to a home as well as additional floor and accommodate a window for increased lighting. When considering adding a gable dormer in a second floor room, especially a bedroom, make sure that it is wide enough to be usable rather than just large enough for a window. Additional natural lighting can more cost effectively be achieved with a skylight than a small, otherwise unusable, dormer.
A disadvantage to gable dormers in high snow areas is that they create valleys in the roof system where snow and ice can accumulate and cause challenges with the roofing and potential leaks.
Shed Dormers:
 If you need more head room in some areas of the second floor, then a shed dormer or two might be a good option to consider. The most common uses of shed dormers are when you have rooms along one wall of your home or cabin where you want unrestricted usable space as caused by low ceiling height. The next most common use of dormers is for second floor bathrooms, again to provide adequate usable floor pace with sufficient ceiling height over bathroom fixtures. Also, over a stairway is a common location for dormers, again to have adequate clearance to meet building code requirements.
Shed dormers are more economical than gable dormers. They are relatively simple to build and roof and don’t create valleys in the roof with potential snow accumulation challenges, but they aren’t as cute as gable dormers. Typically, shed dormer roofs are not steep enough for the snow to slide off, but that isn’t an issue because we design and engineer all of our building to withstand the snow load at each building site.
As with all building options you are considering, contact Gold Valley Log Homes for specific feedback about your desired log home design.

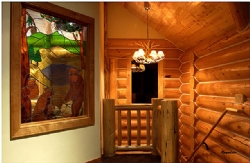 If you would like additional usable space on the entire second floor, but don’t need or want 8’ walls, then pony walls are a viable option. You can determine how much wall height you want or need given the floor plan you want. Although that wall could be stick framed and sided to match the logs below, it makes the most sense to build the pony walls with log. The reason I say it makes the most sense is for several good reasons including the following:
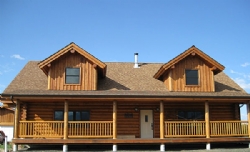 These are the dormers that have a peak to the roof. The advantage of this type of dormer is that they add style and decoration to a home as well as additional floor and accommodate a window for increased lighting. When considering adding a gable dormer in a second floor room, especially a bedroom, make sure that it is wide enough to be usable rather than just large enough for a window. Additional natural lighting can more cost effectively be achieved with a skylight than a small, otherwise unusable, dormer.
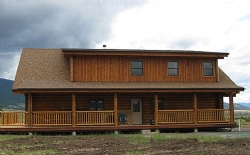 If you need more head room in some areas of the second floor, then a shed dormer or two might be a good option to consider. The most common uses of shed dormers are when you have rooms along one wall of your home or cabin where you want unrestricted usable space as caused by low ceiling height. The next most common use of dormers is for second floor bathrooms, again to provide adequate usable floor pace with sufficient ceiling height over bathroom fixtures. Also, over a stairway is a common location for dormers, again to have adequate clearance to meet building code requirements.
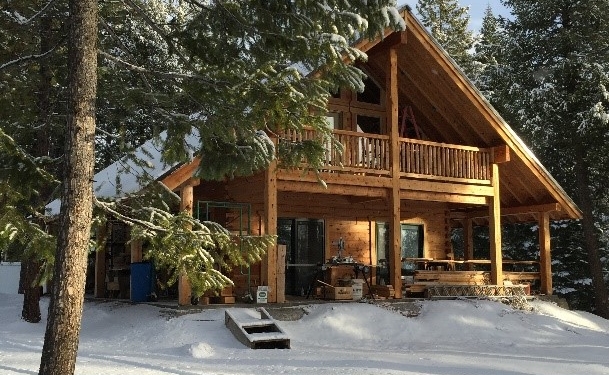
Cascade (Under Construction)
Twin Bridges 3 (Under Construction)
Santa Rosa (Under Construction)
Alta California (Under Construction)
Fishhawk Lake
Battleground WA